You’ve probably seen this pose performed in yoga classes, but do you know its name? The “Three-Legged Downward-Facing Dog Pose” is a yoga pose that involves propping up your body, in the shape of a dog, with your hands and feet. This can be done on all fours, but a dog-like position also works well. To start, start off by propping up your body in the “downward-facing dog” position. Then, you need to lean your head and chest toward the floor. To make this posture look more like a dog, place your hands under your tail and arch your spine.
The 3-Legged Downward-Facing Dog Pose is a popular Asana. It is also called the Downward-Facing Dog Pose and the Downward Dog Pose. Sometimes this pose is performed with the hands on the floor. The 3-Legged Downward-Facing Dog Pose is the most basic and essential of all the yoga poses. It is the pose where you first learn to hold a yoga pose. This Asana is the most challenging and also the most rewarding pose.
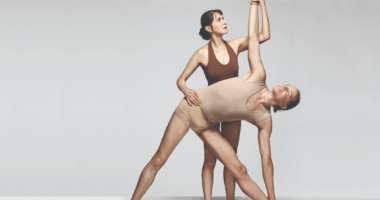
The Head Down Dog pose is undoubtedly one of the best known yoga poses, and you’ve probably come across it many times, from beginner to advanced.
This three-legged variation of the downward dog (also jokingly called the fire hydrant dog) is not only a great way to learn the basics, but also a way to challenge yourself by practicing solid alignment with good posture and one foot up!
Benefits of the three-legged lying dog
The downward facing dog is one of the most famous yoga poses, and for good reason: It can be done by almost anyone and is an excellent exercise to stretch and strengthen the whole body.
It stretches the torso, strengthens the arms and legs, and gives peace and rejuvenation to the brain. The three-legged reclining dog offers all the benefits of the reclining dog, but also stretches the inner and outer thighs and sides of the body and improves balance.
Three-legged downward dog pose, step by step
- Start with the table pose, getting on your hands and knees so that your shoulders are straight above your wrists and your hips are straight above your knees.
- Look at your hands. Make sure your wrists are parallel to the short side of the mat, your fingers are spread and your weight is evenly distributed on your palms and knuckles, especially on your index and middle fingers.
- As you exhale, pull your toes under you and slowly begin to stretch your legs and lift your hips to the ceiling. Keep the knees bent as far as possible to maintain the length of the spine.
- Keep lifting your hips and pressing your thighs against your back. Keep your ears in line with your arms and strengthen them with your upper outer arm.
- Continue to take three deep breaths into the downward facing dog pose, creating space in your feet and bringing your heels closer to the floor.
- As you inhale, extend your right leg up and back and lift it to the ceiling. Avoid the tendency to tilt the pelvis and immediately open the hips to try to lift the leg as high as possible; instead, keep the hips horizontal and the right leg bent (the heel pulled back and the toes pointing to the ground).
- You can stay here with your hips flat if that feels enough, or to go even lower, start bending your right knee so your foot goes to the left. Point your bent knee toward the ceiling and begin to open your hips and bend them directly toward each other.
- Then the weight should be moved to the left side. Distribute your weight evenly between both palms and lower your right shoulder, keeping your upper body at a right angle.
- Hold the pose for five to ten breaths, then as you exhale, slowly spread your hips and lower your outstretched leg. Gently spread your legs in a downward dog and repeat on the other side.
Tips
- It doesn’t matter if your heels can touch the ground in the head down dog. The main action here is to evenly lengthen the spine and legs. Pushing on the heels makes the spine bulge and disturbs posture. If you want, you can try placing a rolled up yoga mat or blanket under your heels for extra support.
- This downward dog variation is ideal for runners and cyclists who tend to have tight hips and legs.
- As you begin to lift your leg into the downward dog position, imagine a straight line running down your leg from the outside edge of your arm. This can help with alignment.
- Don’t forget to breathe!
Photo credits: Julia Lee
Frequently Asked Questions
How do you do a three-legged downward dog?
Start in a downward dog position with your hands on the ground. Bend your right knee and place it on the ground, then bend your left knee and place it on top of the right. Straighten both legs to come into a three-legged downward dog position.
How do you raise your leg in downward dog?
To raise your leg in downward dog, you would bend your knee and then straighten it out.
How do you do downward dog step by step?
Step 1: Start in a standing position with your feet together and your hands on the ground. Step 2: Bend your knees and lower yourself to the ground, placing your hands on the floor in front of you. Your body should form a straight line from head to toe. Step 3: Straighten one leg and place it forward so that it is perpendicular to the other leg. Keep both legs straight as you do this step. You should feel a stretch in your hamstrings. Step 4: Straighten your arms and raise them up so that they are parallel to the ground. Keep your back straight as you do this step. Step 5: Bend your elbows and bring them in towards your body, keeping them close to the sides of your torso. Your palms should be facing down towards the ground. You should feel a stretch in the front of your shoulders and chest area. Step 6: Straighten your arms and raise them up so that they are parallel to the ground. Step 7: Bend your elbows and bring them in towards your body, keeping them close to the sides of your torso. Step 8: Straighten your arms and raise them up so that they are parallel to the ground. Step 9: Bend your elbows and bring them in towards your body, keeping them close to the sides of your torso. Step 10: Straighten your arms and raise them up so that they are parallel to the ground. Step 11: Bend your elbows and bring them in towards your body, keeping them close to the sides of your torso.
Related Tags:
three-legged dog pose sanskritthree-legged dog pose benefits3 legged dog pose3 legged down dog variationsthree legged downward dog yoga poseeka pada adho mukha svanasana,People also search for,Feedback,Privacy settings,How Search works,See more,Adho mukha svanasana,Trikonasana,Utkatasana,Uttanasana,three-legged downward-facing dog pose hip-opening variation,three-legged dog pose sanskrit,three-legged dog pose benefits,3 legged dog pose,3 legged down dog variations,three legged downward dog yoga pose,yoga three legged dog bent knee